> ## Documentation Index
> Fetch the complete documentation index at: https://utexo-e7ed9bd0-update.mintlify.site/llms.txt
> Use this file to discover all available pages before exploring further.
# Connect to RLN Node
### Connecting to Node with mTLS
Follow these detailed steps to establish a secure connection to your node using the provided mTLS credentials:
* Navigate to the Connect Page: open your web browser and go to the /connect page. This page provides the connection details for your node. URL: `https://www.thunderstack.org/{nodeId}/connect`
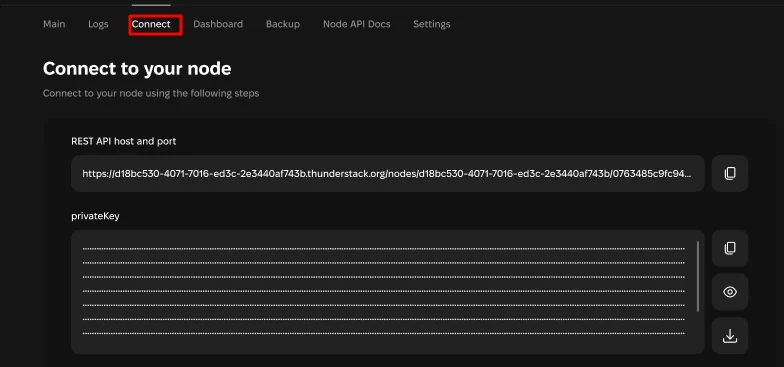 * View Connection Details: the connect page displays the unique endpoint URL for your node, along with the private key and certificate required for the mTLS connection. These credentials are automatically generated for your session and are required to establish a secure connection.
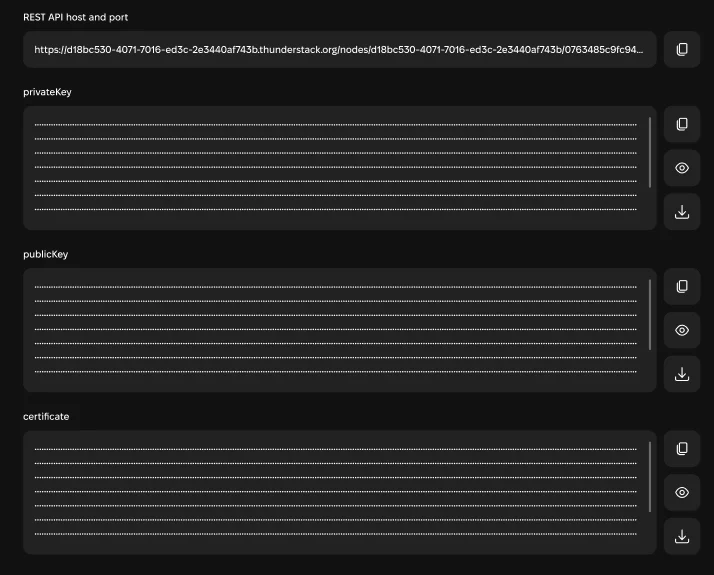
* Download Credentials from the /connect page:
* Private Key: a `.key` file (e.g., `privateKey.key`) containing your private key.
* Certificate: a `.pem` file (e.g., `certificate.pem`) containing your public key certificate.
* Copy Endpoint URL: the page will display the unique endpoint URL formatted like: `https://{userId}.thunderstack.org/nodes/{userId}/{nodeId}/`
* View Connection Details: the connect page displays the unique endpoint URL for your node, along with the private key and certificate required for the mTLS connection. These credentials are automatically generated for your session and are required to establish a secure connection.
* Download Credentials from the /connect page:
* Private Key: a `.key` file (e.g., `privateKey.key`) containing your private key.
* Certificate: a `.pem` file (e.g., `certificate.pem`) containing your public key certificate.
* Copy Endpoint URL: the page will display the unique endpoint URL formatted like: `https://{userId}.thunderstack.org/nodes/{userId}/{nodeId}/`
 * Save the downloaded files in a secure location on your computer. You will reference these files when making requests.
* Use the example curl command shown on the /connect page as a template. Modify the example by replacing placeholders with the actual paths to your saved key and certificate files.
* Save the downloaded files in a secure location on your computer. You will reference these files when making requests.
* Use the example curl command shown on the /connect page as a template. Modify the example by replacing placeholders with the actual paths to your saved key and certificate files.
 Example pattern (replace paths/placeholders accordingly):
```text theme={null}
curl --key /path/to/privateKey.key --cert /path/to/certificate.pem https://{userId}.thunderstack.org/nodes/{userId}/{nodeId}/
```
### Connecting to Node with API token
Follow these steps to connect using an API token.
* Example usage with curl:
```text theme={null}
export CLOUD_API_TOKEN=
curl -H 'Authorization: Bearer ${CLOUD_API_TOKEN}' https://node-api.thunderstack.org//
```
* Follow this link to obtain CLOUD\_API\_TOKEN.
Example pattern (replace paths/placeholders accordingly):
```text theme={null}
curl --key /path/to/privateKey.key --cert /path/to/certificate.pem https://{userId}.thunderstack.org/nodes/{userId}/{nodeId}/
```
### Connecting to Node with API token
Follow these steps to connect using an API token.
* Example usage with curl:
```text theme={null}
export CLOUD_API_TOKEN=
curl -H 'Authorization: Bearer ${CLOUD_API_TOKEN}' https://node-api.thunderstack.org//
```
* Follow this link to obtain CLOUD\_API\_TOKEN.